Basic Animating in Synfig
posted on Feb 20, 2018 by Meg James
We’ve covered some basics of drawing in Synfig Studio. We’ve also gone over how to make a useful character model. What’s next? We get to animate now, right? I’ve spent the last week or so trying to figure out the secret to animating easily (and well) in Synfig. Guess what I found out!
There is no secret
That’s riiiight! There’s no secret to animating easily. Animating, as it turns out, is probably just going to be time-consuming no matter what. That’s just how it is. I haven’t had as much time as I’d hoped in the past few weeks to work on animation, but so far I’ve found no magic bullet or special shortcut. At least not one that makes your animation look good. So what do we do now?
Frames per second, keyframes, and you
First things first: frames per second, and keyframes. Frames per second (FPS) determines how fast things go, basically. 24 is pretty common, but if you’re working on your own animation, there are no rules. However, I’m going with 24. To change the FPS, you have to find the “Canvas” option on the top toolbar. You can access the file’s Properties from here.
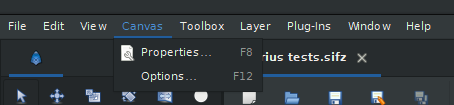
Find the “Properties” selection under the “Canvas” menu
Once you’ve reached the Properties window, select the Time tab. This will show you the frames per second, start time, end time, and duration of your file. Frames per second is our main focus right now, but you may also want to edit the end time or duration depending on how long you plan for your animation to be. You can also change that later.
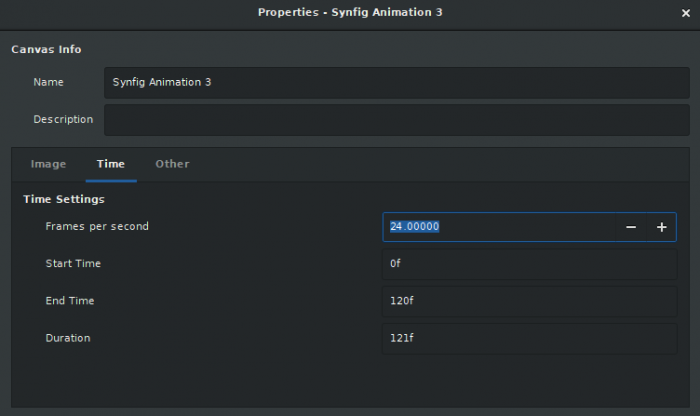
In the Properties window, you can edit the duration and frames per second under the “Time” tab
Once you decide on how many frames per second you want to use, go ahead and make a keyframe. If you know your FPS, you can probably approximately guess the timing you want on a simple action. If you goof it up, luckily keyframes are easy to edit in terms of time placement.
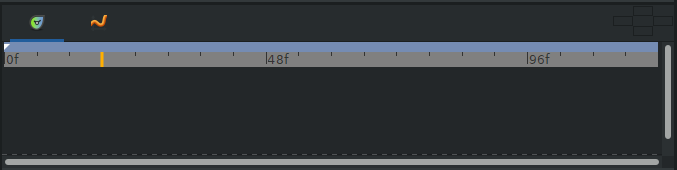
Synfig’s animation timeline
For mine, I started at about 18 frames, which is less than one second of animation. I was planning to start with a relatively simple movement, which shouldn’t take long. On Synfig’s timeline, found below the main canvas, I selected the 18 frame mark.
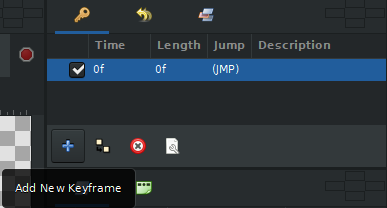
The keyframe menu, with the option to add a new keyframe
Up in the keyframe section (top right, for me) you’ll see an option to add a new keyframe. This will add a keyframe to whatever point on the timeline you have selected.
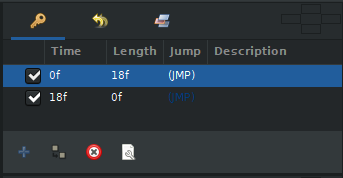
The keyframe section with two keyframes at 0 frames and 18 frames
Great! We now have two keyframes. The keyframe at 0 frames, which I think is there by default, will be the starting point. The keyframe at 18 frames will be the ending point for this animation. (For now, anyway.) Now it’s time to start animating.
If you need to edit the position of a keyframe, it’s not hard to do.
Editing a keyframe’s time
Double click on the keyframe’s “Time” and change the number to the frame you want. For example, if I wanted to change the animation from 18 frames to 24 frames, I would replace “18f” with “24f.” Yes, it’s that easy!
The real fun begins
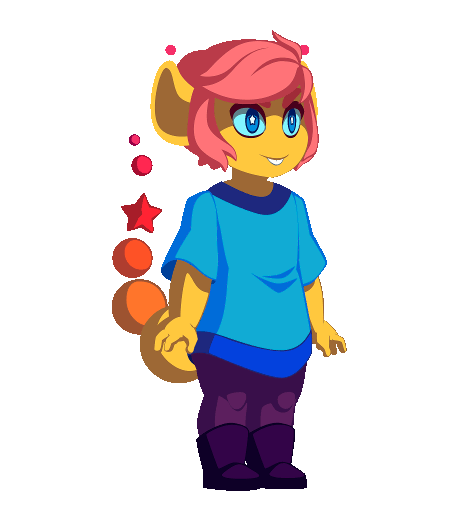
The first part of animating is to figure out what you’re going to animate. In more complex animations, even series like Cinnabar and Almanac: Adventures, there would be multiple parts of a character to animate at once. Luckily, we’re practicing. So, for the sake of practice and demonstration, I chose just one arm for now. Arms are good and straightforward to start with, I figure.
Before you start moving objects around, make sure you have your keyframe selected in the timeline. After that, turn on animation editing mode.
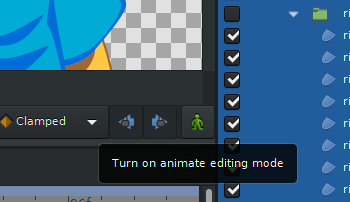
The option to turn on animation editing mode
To turn on animation editing mode, you have to find this icon that looks like a tiny green person. Clicking on this green person will turn on animation editing mode.
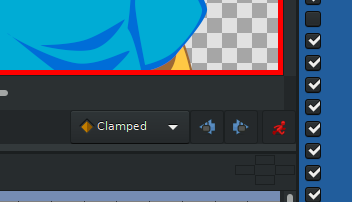
Animation editing mode turned on
Once animation editing mode is on, the green person turns into a running red person. Your canvas also has a loud red border around it, so you can never forget that animation editing mode is on. Any changes you make, while animation editing mode is on, will affect animation. If you make changes with animation editing mode off, you’ll just end up changing the base drawing, which can get ugly if you’re not expecting it.
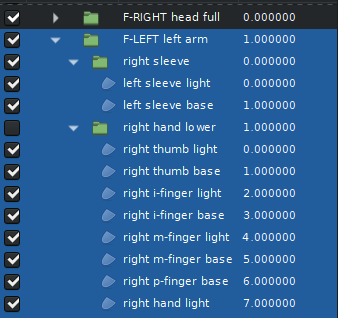
With animation mode on, now you can start doing things. In my case, I was going to move one of Darius’s arms. I wanted to just move the entire thing at once to start with, so I grabbed all the layers in the right arm group.
Selecting multiple layers to move at once
If you have your layers grouped as demonstrated in one of the previous posts, you can just right click on the “arm” group and select all child layers. You can also just shift+click to select two layers and anything in between them.
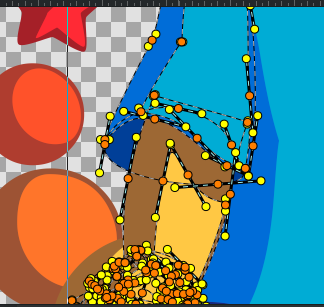
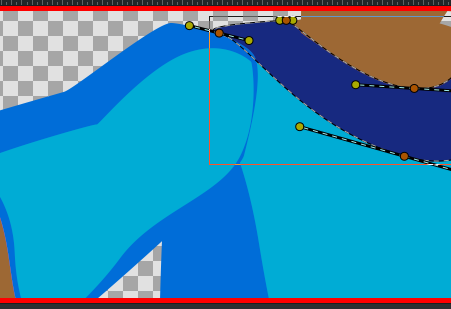
Use ctrl+A to “select all” the nodes of the selected layers
In the canvas, use the ctrl+A command to select all the nodes on the layers you just selected. It’ll look a lot like the above image, with a huge mess of bright glowing orange and yellow nodes. Make sure these stay selected if you want to move them all at once, which I do. I’m going to use the rotate tool for this.
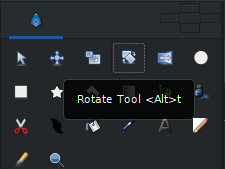
Your friend, the rotate tool
If you have all the nodes in the entire arm selected when you use the rotate tool, the entire arm will rotate nicely. If you only have one or a few of the nodes selected, you’ll probably end up with some… interesting results. For the sake of this post, let’s not try that. So, at the 18 frame point on the timeline, I went ahead and rotated Darius’s right arm.
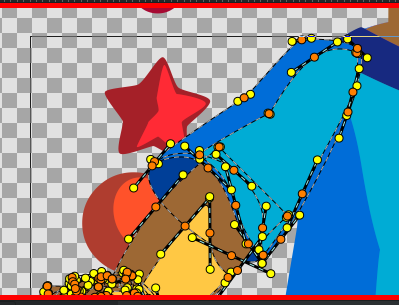
Using the rotate tool to move an arm
After the initial rotate, you may need to move the whole thing around to make sure it lines up with where you want it. In this case, I moved Darius’s arm a little bit to make sure his upper arm still attaches to his torso at the shoulder area.
Hooray! A first Synfig animation! How easy was that?
Looks a little stiff, doesn’t it?
Oh. Oh dear.
We’re not done yet!
Obviously, this animation could use a little refinement. I hope you remember the previous post about the basics of drawing in Synfig, because you’ll probably be putting those skills to use when you clean up your animation. You’ll very likely also be using more keyframes.
Personally, I found it most helpful to click through the animation frame by frame to find out where to start fixing things.
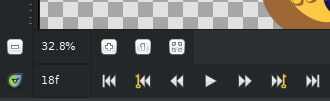
Use these arrows to jump to your frames or keyframes one by one
You can view every frame of the animation by using the double arrow icons below the canvas. The icon in the middle, a single arrow, is a “play” button. You can also use the arrows with the keys next to them to jump from keyframe to keyframe. When you start editing your animation, be sure animation editing mode is on. Make a new keyframe, too, so things don’t get too out of hand.
Use your Synfig drawing skills to carefully edit objects
I went through my frames a few times and ended up adding several keyframes at points that I thought needed work. Yes, the whole thing needed work, but I didn’t necessarily need to edit all 18 frames individually. The automatic betweening can still get us part of the way. The primary issue for Darius was the shoulder, obviously, so for me that was a good place to start.
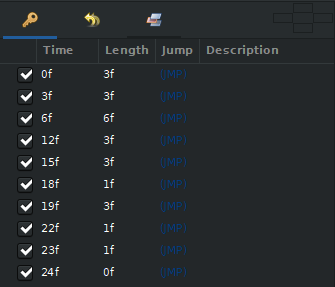
It’s okay to add more keyframes!
As you can see, I ended up with far more than just two keyframes. Some of them have several seconds between, while some last only one frame each (essentially frame by frame animation). This type of animation cleanup is a bit time consuming and maybe tedious, but the results can be worthwhile. And if they’re not, that’s fine too! We’re learning, and learning projects don’t always have to turn out great.
It’s getting there!
Perfect? No! But much improved! And that’s how it is with animation. You really just gotta get in, do the work, and keep fiddling with it. It’s not easy and it’s not fast, but it’s worth it!
(Having said that, if I do find a quicker and easier way, I’ll be back with that info.)
– Meg James ✨
You must be a member to post comments.